Friday, November 5, 2010
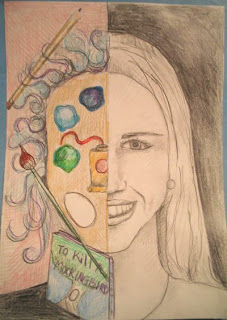
Objective: Students will draw half a realistic self-portrait by looking in a mirror and drawing what they see and from learning about how the human face proportions.
Students will draw the other side of their self-portrait abstractly by drawing who they think they are not what they look like, using symbols, shapes, and objects.
Students will make a portrait that shows technical skills using the pencils, color, shading, value and composition by learning about each term and how they look in a work of art.
Art History:
Students will have prior knowledge of historical self-portraits and why artists make them by doing a token response to some historical self-portraits.
Art Criticism:
Students will be able to name 3 strengths and 2 areas to work on of a classmate's work by participate in an art critique.
They will explain why they created their portrait as they did by writing an artist statement.
Aesthetics:
Students will formulate opinions about if art has to be made for others or can it be made for oneself and does that take away from its value or beauty by have a class discussion.
II. Overview of Lesson (Main message)
Self-portraits have been done by many artists. They are records of where the artist has come from and who they were at the time. They should age changing as well as artistic styles developing. They are useful tools to get to know the artist and trace their lives. The students will make a self-portrait that is split down the middle. One side is realistic and one side is abstract showing who they are inside. It is snap-shot in time that will show both what they look like at the time and who they are, their interests, and developmental abilities.
III. Art Concept(s)/Vocabulary:
Abstraction, symbolism, contour line, shading, cross-hatching, value, proportions, Contour, line, highlights, composition, realistic
Art making Processes and Techniques: Sketch, layout, measure
Art Elements/Principles of Design:
Value, shape, line, balance, proportion
Recreating the Mona Lisa
Monday, April 12, 2010
Combining Master Paintings
Step #1: Look online at pictures from the following artists and select TWO pictures that you would like to combine to make into one image:
Vincent Van Gogh
Helen Frankenthaler (abstract)
Katsushika Hokusai
M. C. Escher
Henri Matisse
Georges Braque (abstract)
Joan Miro (abstract)
Janet Fish
Peirre-Auguste Renoir
David Hockney
Andre Derain
Mary Cassatt
Georgia O’Keeffe
Leonardo da Vinci
Diego Rivera
Wassily Kandinsky (abstract)
Sonia Delaunay
Honore Daumier
Paul Klee
Chuck Close
Pablo Picasso (some abstract)
Georges Seurat
Maurice de Vlaminck
Camille Pissarro
Paul Cezanne
Edgar Degas
Winslow Homer
Rene Magritte (surrealist)
Paul Gauguin
Salvador Dali (surrealist)
Andy Warhol
Roy Lichentstein (cartoonish)
Jacob Lawrence
Piet Mondrian (abstract)
Claude Monet
Edouard Manet
Step #2 – Print out your pictures in black and white, put your name on both; make sure you make a note as to who the artist is and what the title of the image is for each picture you print out
Step #3 – Create a line drawing on a sheet of paper that combines the two images together (combine elements from one image with elements from the other image to create your own original image); on the back of your paper write the names of the artists and the images that you are using
Step #4 – Color your image however you want to (you may choose to use the same color scheme that the original artists used or you may create your own!)
Thursday, January 14, 2010
Night Sky Painting
Examples of Student Work:
Objective: Students will look at and discuss a variety of artistic representations of the night sky, and compare the artworks to scientific representations of the constellations and stars; and paint their own representation of the night sky.
Section 1:
Draw a star and explain what it looks like, compare common representations of 5 & 6 point stars.
A. Do Now On paper provided, draw a star. Share drawings, discuss similarities and differences. Why do they draw it they way they did? Where have they seen stars like these? Is this what stars really look like from earth? Why do people draw them with points at the edges instead of spheres? Why does that happen? Has anyone ever see a star twinkle?
B. Explain that stars are actually spheres of gas, and appear to have rays or points because we are looking at them from a great distance, through the filtering of the atmosphere.
C. Compare night sky paintings by van Gogh, Munch, Matisse and Miro.
D. Summarize how have artists made choices in how to show stars?
Night Sky Paintings by Vincent Van Gogh, Edvard Munch, Henri Matisse and Joan Miro
Section 2: Study real stars in photos from observatories and satellites.
A. You are an artist who is researching the night sky for inspiration for a painting. After looking at how artists in the past have depicted stars, you are here to collect visual data about actual stars that scientists have gathered in four catgories: COLOR, SHAPES, IMAGE, INFORMATION. You must spend some time at both websites below in order to complete your research.
B. Go to each of the websites below, following the instructions for each to find the visuals, in order to make list what you see into the 4 different categories on your sheet. Look at as much as possible on your way through the galaxies!
(Click on underlined words to go to the Internet sites)
C. The Stars page at NASA KIDS Space & Beyond has many different sections. Visit About Stars, What are Stars? and the Stars & Nebulae Gallery while at this website.
D.The Hubble Site is a wealth of information about the skies above us. Click on the Gallery to view pictures.
Section 3: Create a painting of the night sky, incorporating ideas from the art & science studied.
A. Guided Practice Demo of painting techniques, color wheels and value charts: Wet brush, dry brush, how to keep a point on the brush, primary and secondary colors. Have students mix together a secondary color, and then create tints and shades with it on a value chart. Discuss different ways to create shades, and how to mix black and white with color.
B. Independent Practice: Create color wheels and value charts using the Xeroxes.
C. Guided Practice Review and discuss the art and images of stars, focus on the artist choices. How will they choose to show stars in a night sky? Do they want to see some land, or only the sky? Review variety of painting techniques and how they can affect the painting. Plan the painting first by sketching with a pencil, and then begin painting.
D. Independent Practice Begin painting by planning sketch, then painting.
Perspective
PERSPECTIVE = = depth or distance we think we see in art
DEPTH = appearance of distance on a flat surface
ONE POINT PERSPECTIVE = front sides of objects are parallel to the picture plane with the side edges receding towards a single point (we call this single point the VANISHING POINT)
VANISHING POINT = point at which orthogonals converge (meet)
ORTHOGONALS = imaginary lines that move towards the vanishing point
TWO POINT PERSPECTIVE = front, back and side edges converge (meet) at two points (vanishing points)
Perspective Techniques:
1) Overlapping - when one object covers part of another object the full object appears closer to the viewer
2) Size - larger objects seem closer to the viewer than smaller objects (the further away something is, the smaller it should be)
3) Placement - objects placed near the bottom seem to be closer than objects placed higher
4) Detail - objects with clear, sharp edges and many details seem to be closer to the viewer; objects that lack detail and have fuzzy/unclear outlines seem to be further away; artists leave out details of objects that they want to seem far away
5) Lines - parrallel lines seem to move toward the same point (vanishing point) as they move further away from the viewer; when lines are drawn they should grow more narrow as they move into the back ground (examples: streams, rivers, roads)
6) Color - brightly colored objects seem to be closer to the viewer; objects with pale/dull colors seem to be further away. Paler shades in background convey a sense of distance; warm colors make objects seem closer, cool colors make objects seem further away
Subscribe to:
Posts (Atom)